Published: 5/3/2025
🕒 3 min read
Skip bloatware and avoid future driver conflicts by doing a proper clean install of your NVIDIA GPU drivers manually. This step-by-step guide keeps your system lean and stable.
Source: DELL Technologies
Why Manual Clean Installation?
GeForce Experience often installs extra services and telemetry. A manual clean install ensures you only get what you need—display driver and performance-critical components—without background apps or clutter.
Step 1: Uninstall Current Drivers Using DDU (Optional)
- If you’re unfamiliar with DDU, see our Display Driver Uninstaller (DDU) guide.
- Download DDU from Guru3D.
- Extract the ZIP and run DDU from Windows Safe Mode (DDU can reboot you into Safe Mode).
- Select “GPU” and “NVIDIA”.
- Click Clean and restart.
Step 2: Download the Latest Drivers
- Go to NVIDIA Driver Download.
- Select your GPU model manually (avoid auto-detection).
- Choose Game Ready Driver (GRD) or Studio Driver (SD) based on your use case.
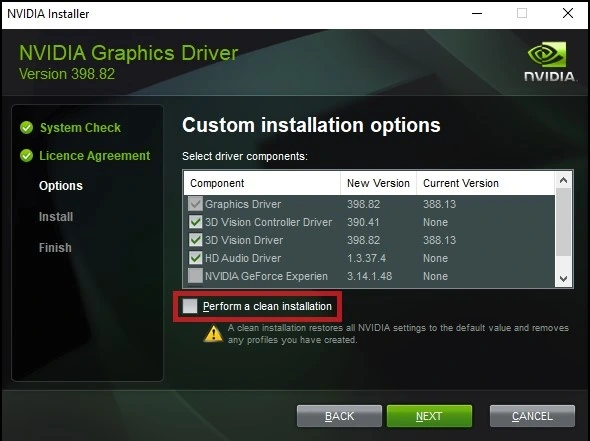
Step 3: Perform a Custom Clean Installation
- Run the downloaded driver installer.
- Select NVIDIA Graphics Driver (not “NVIDIA Graphics Driver and NVIDIA App”).
- Choose Custom (Advanced) when prompted.
- Check Perform a clean installation.
- Uncheck optional components (GeForce Experience, HD Audio, Shield Wireless) if you don’t need them.
- Proceed with installation (the screen may flash).
Post-Install Recommendations
- Reboot after installation completes.
- Verify driver version: Desktop right-click →
NVIDIA Control Panel→ System Information. - Optional: reduce telemetry with NVIDIA Profile Inspector.
Final Thoughts
A manual clean install prevents leftovers from old versions and avoids unnecessary services that can slow your system. It’s the preferred method for gamers, power users, and anyone troubleshooting GPU issues.
Bookmark this guide and repeat after major driver releases to keep your system running lean and stable.